
OpenAPI UI
Overview
SmallRye offers an OpenAPI user interface component which displays a web page based on your application’s OpenAPI document. Through that UI, users can invoke the operations declared in the document.
The Helidon OpenAPI component allows you to integrate the SmallRye UI into your application, adding the UI web page to your application very simply.
Maven Coordinates
To enable Helidon OpenAPI UI support, add the following dependency to your
project’s pom.xml (see Managing
Dependencies).
<dependency>
  <groupId>io.helidon.integrations.openapi-ui</groupId>
  <artifactId>helidon-integrations-openapi-ui</artifactId>
</dependency>
And add a runtime dependency on the SmallRye UI.
<dependency>
  <groupId>io.smallrye</groupId>
  <artifactId>smallrye-open-api-ui</artifactId>
  <scope>runtime</scope>
</dependency>
Also, make sure your project has the following dependency.
<dependency>
  <groupId>io.helidon.openapi</groupId>
  <artifactId>helidon-openapi</artifactId>
</dependency>
This dependency allows your application to create, configure, and register the
OpenApiFeature service.
Usage
Make sure your application incorporates Helidon OpenAPI support as described in detail in the Helidon OpenAPI documentation. Helidon automatically prepares the OpenAPI UI with default settings if you also declare a dependency on the Helidon OpenAPI UI integration component as explained above. The API section below illustrates adding OpenAPI to your application and customizing the UI behavior.
After you modify, build, and start your Helidon SE service, you can access the
OpenAPI UI by default at http://your-host:your-port/openapi/ui. Helidon also
uses conventional content negotiation at http://your-host:your-port/openapi
returning the UI to browsers (or any client that accepts HTML) and the OpenAPI
document otherwise.
You can customize the path using either the API or configuration.
The example below shows the UI if you modify the Helidon SE QuickStart greeting application to contain a static OpenAPI file which describes the service endpoints.
Example OpenAPI UI Screen: 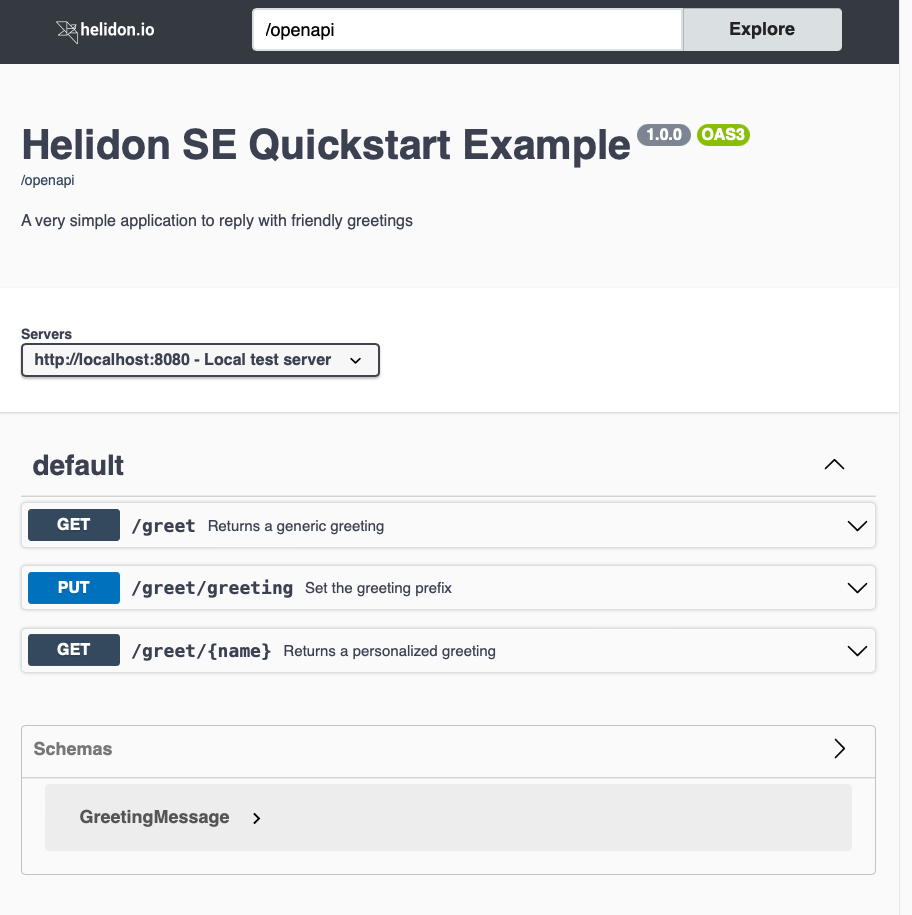
With the OpenAPI UI displayed, follow these steps to access one of your service’s operations.
- Find the operation you want to run and click on its row in the list.
- The UI expands the operation, showing any input parameters and the possible responses. Click the "Try it out" button in the operation’s row.
- The UI now allows you to type into the input parameter field(s) to the right of each parameter name. Enter any required parameter values (first highlighted rectangle) and any non-required values you wish, then click "Execute" (highlighted arrow).
- Just below the "Execute" button the UI shows several sections:
- the equivalent
curlcommand for submitting the request with your inputs, - the URL used for the request, and
- a new "Server response" section (second highlighted rectangle) containing
several items from the response:
- HTTP status code
- body
- headers
- the equivalent
The next image shows the screen after you submit the "Returns a personalized greeting" operation.
Note that the UI shows the actual response from invoking the operation in the "Server response" section. The "Responses" section farther below describes the possible responses from the operation as declared in the OpenAPI document for the application.
Example OpenAPI UI Screen: 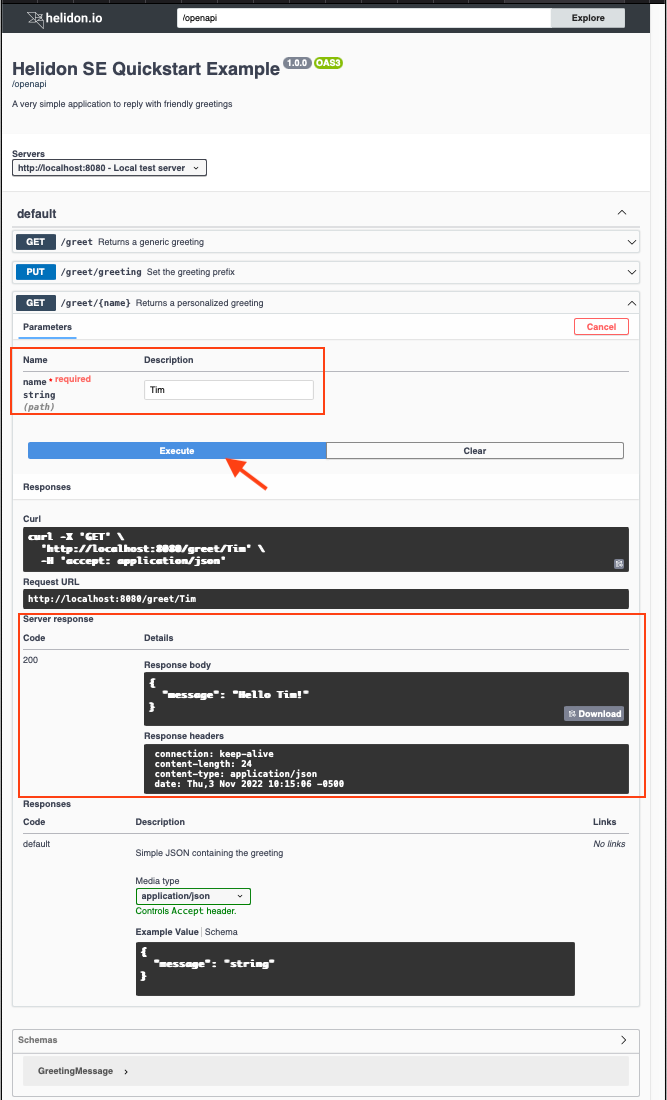
API
With the Helidon OpenAPI UI dependency in your pom.xml file, the OpenAPI
support automatically includes the default UI behavior, possibly modified by any
UI settings you have in your configuration. You do not have to do anything else
to enable the UI.
Creating OpenApiFeature with Automatic UI Behavior
Some applications explicitly create the OpenApiFeature object to tailor its
behavior before registering it with the server. If your pom.xml includes a
dependency on the OpenAPI UI component, then any OpenApiFeature object your
application builds prepares the default OpenAPI UI behavior, possibly modified
as above by any UI settings you have in your configuration.
Create OpenApiFeature with automatic UI:
If your code invokes the OpenApiFeature.Builder config method, Helidon
automatically applies the ui section of the openapi configuration to the UI.
Customizing the UI Behavior
You can control some of the behavior of the UI programmatically in two steps:
- Create an
OpenApiUiConfig.Builderand invoke methods on it to set the UI behavior, then invoke the builder’sbuildmethod to create theOpenApiUiobject. - Invoke the
addServicemethod onOpenApiFeature.Builder, passing theOpenApiUiobject you prepared above.
The following example illustrates these steps, combining configuration with explicit programmatic settings.
Create OpenApiUi and OpenAPISupport instances:
The order in which your code invokes the methods on OpenApiUi.Builder and
OpenApiFeature.Builder determines the outcome. For instance, the example above
adds the UI service to the OpenApiFeature.Builder before applying
configuration to the OpenApiFeature.Builder. If the configuration contains a
setting for the UI web-context value, then the UI uses the configured value
and not the programmatic value because your code applies the configuration
later. Your code should typically apply configuration after setting any values
programmatically. Doing so allows users or deployers of your service to set the
behavior using configuration according to their particular needs which your code
might not be able to anticipate.
webContext(String) method on OpenApiUi.Builder sets the web context
where the UI should respond instead of the default /openapi/ui. Helidon uses
the provided string to set the entire web context for the UI, not as a
suffix appended to the web context for the OpenAPISupport service.Configuration
To use configuration to control how the Helidon OpenAPI UI service behaves, add
a server.features.openapi.services.ui section to your configuration file, such
as application.yaml.
Configuration options
| Key | Type | Default | Description |
|---|---|---|---|
web- | String | Full web context (not just the suffix) | |
options | Map< | Merges implementation-specific UI options | |
enabled | Boolean | true | Sets whether the service should be enabled |
The default UI web-context value is the web context for your OpenApiFeature
service with the added suffix /ui. If you use the default web context for both
OpenApiFeature and the UI, the UI responds at /openapi/ui.
Recall that you can configure the Helidon OpenAPI component to change where it serves the OpenAPI document.
Configure OpenAPI behavior:
In this case, the path for the UI component is your customized OpenAPI path with
/ui as a suffix. With the example above, the UI responds at /myopenapi/ui
and Helidon uses standard content negotiation at /myopenapi to return either
the OpenAPI document or the UI.
Separately, configure the entire web context path for the UI independently of the web context for OpenAPI.
Configuring the OpenAPI UI web context:
server.features.openapi.services.ui.web-context setting assigns the
entire web-context for the UI, not the suffix appended to the
OpenApiFeature endpoint.With this configuration, the UI responds at /my-ui regardless of the path for
OpenAPI itself.
The SmallRye OpenAPI UI component accepts several options, but they are of
minimal use to application developers, and they must be passed to the SmallRye
UI code programmatically. Helidon allows you to specify these values using
configuration in the server.features.openapi.services.ui.options section.
Helidon then passes the corresponding options to SmallRye for you. To configure
any of these settings, use the enum values they are all lower case declared in
the SmallRye Option.java class as the keys in your Helidon
configuration.